When I began working with Canva I found myself feeling quite overwhelmed by the wide range of choices and functionalities available. One aspect that often eluded my memory was DPI, which stands for dots per inch. While it may sound intimidating it's an essential concept to grasp for producing images. DPI essentially gauges the sharpness of an image by indicating how many ink dots or pixels can be accommodated within an inch. The quality of an image improves with a higher DPI particularly in print.
In the realm of design DPI plays a crucial role in determining the clarity of your visuals whether it's an image in a presentation or a colorful print on a poster. For example an image intended for media usually needs a DPI of 72 while printed materials are best at 300 DPI at least. Overlooking this detail can result in images that are pixelated or blurry causing setbacks for designers.
Getting a grip on DPI isn't just about tweaking things; it's about enhancing the overall quality of your work and making sure your designs stand out in every format. It's a tiny aspect that can have an impact and once I realized its significance it changed the way I tackled my projects.
How to Check the DPI of Your Canva Images

Finding out the DPI of your images in Canva is easier than it seems. Although Canva doesn't directly display DPI in its interface you can still figure it out by following some straightforward steps. Here's how you can do it.
- Download your image from Canva in the desired format (PNG or JPG).
- Open the downloaded image using an image editing tool like Photoshop or an online DPI checker.
- Look for the properties or info section where you can find the DPI listed.
Another approach is to utilize a DPI calculator available online. Simply upload your picture and it will give you the DPI along with information such as size. While this may appear like a task it's crucial for making sure your images are prepared for printing.
As a little suggestion I always have a handy checklist on hand when Im putting the finishing touches on my designs to make sure I dont miss the DPI settings. Its become a habit in my creative process and I encourage you to do something like that too.
Also Read This: Identifying Getty Images Photos and Recognizing High-Quality Content
Step-by-Step Guide to Changing DPI in Canva
Altering the DPI in Canva can prove to be somewhat challenging as the platform lacks a straightforward setting for modification. Nevertheless you can efficiently control your DPI by adhering to these steps.
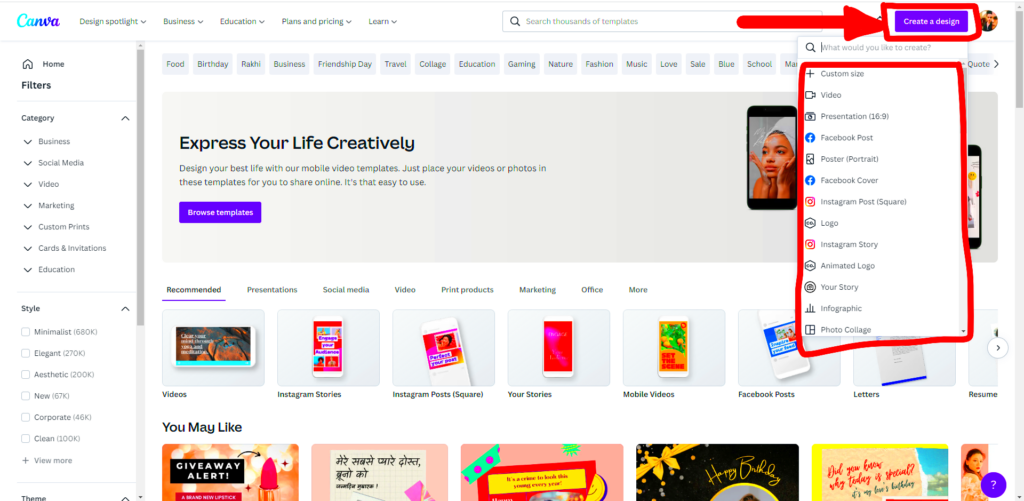
- Create Your Design: Start by designing your image in Canva. Focus on the elements you want to include, keeping in mind the final output.
- Download Your Design: Once satisfied, click on the “Download” button. Choose either PNG or JPG for best results.
- Use an External Tool: After downloading, you need to use an external tool to change the DPI. Open the image in software like Photoshop or an online tool that allows DPI adjustments.
- Change the DPI: Locate the option for changing the DPI in the software and set it to your desired value (usually 300 for print). Save the image again.
Initially, this workaround might seem a bit inconvenient but with practice it becomes second nature. Personally I see it as a small trip that guarantees my designs shine whether they are displayed digitally or in print.
Keep in mind that although Canva has great design features achieving top notch results usually requires going the extra mile beyond what the platform provides. Feel free to check out other resources and tools to perfect your images.
Also Read This: A Beginner's Guide to Exploring and Using Imago Images for Stunning Projects
Best Practices for Choosing the Right DPI
Finding the DPI for your images can be a delicate balance between sharpness and practicality. After going through my fair share of mistakes I've gained a deeper understanding of the subtleties at play. When it comes to crafting designs for various platforms grasping the significance of DPI is crucial.
Here are a few tips and insights I've picked up during my journey.
- Know Your Purpose: Before you start designing, identify where your image will be used. For digital platforms, a DPI of 72 is generally sufficient. For print, however, you should aim for 300 DPI to ensure sharpness and detail.
- Consider Image Size: The physical dimensions of your image also matter. Larger images need higher DPI to maintain quality. If you're designing a flyer, for instance, your DPI and size should align for the best output.
- Preview Before Finalizing: Always preview your designs at 100% zoom. This gives you a realistic view of how it will look in its final form. I’ve often been surprised by how things look at full size!
- Test Prints: If possible, do a test print of your designs. This small step can reveal how your images translate from screen to paper and allow you to make necessary adjustments.
By embracing these strategies you can greatly improve the caliber of your visuals. Its an endeavor that is well worth pursuing and your future self will appreciate the dedication you put in.
Also Read This: Inviting Friends to My Hero Ultra Rumble Explained
Common Mistakes to Avoid When Changing DPI
As an aspiring designer I encountered challenges while adjusting DPI. Each blunder served as a chance to grow highlighting the significance of being thorough in design. Here are a few mistakes to avoid.
- Ignoring the Original Size: Changing the DPI without considering the original size of the image can lead to unwanted pixelation. Always ensure the image’s dimensions match your requirements.
- Using Low-Quality Images: If your starting image is of low quality, increasing the DPI won’t magically enhance its appearance. Ensure you're working with high-resolution images from the get-go.
- Overlooking File Formats: Different formats can affect image quality. For instance, JPGs can lose quality when re-saved. Opt for PNGs or TIFFs when preserving quality is essential.
- Not Adjusting After Changing DPI: After changing DPI, be sure to adjust the dimensions accordingly. Failing to do this can result in unexpected cropping or resizing.
Steering clear of these blunders will spare you from future troubles. Every stumble serves as a valuable lesson contributing to your evolution as a creative individual.
Also Read This: Where to Find the Featured Section on LinkedIn and How to Add Content to Your Profile
How DPI Affects Your Images on Different Platforms
The effect of DPI goes beyond aspects it plays a crucial role in shaping the way your visuals are perceived on different platforms. I had this epiphany while posting my creations on social media and observing how they appeared markedly different from their printed counterparts.
Here’s how DPI can change the game:
| Platform | Recommended DPI | Impact on Quality |
|---|---|---|
| Social Media | 72 | Images load quickly and appear sharp on screens. |
| Websites | 72-150 | Balancing quality and loading speed for user experience. |
| 300 | Ensures crisp, high-quality output that captures attention. |
When I uploaded my designs to the internet for the time, I felt disappointed by the pixelated appearance of the prints. It served as a wake up call that different platforms have varying standards. Knowing about DPI allows you to customize your creations for target audiences making sure they have the desired impact.
To sum up paying attention to the impact of DPI on your images can greatly improve their impact on different platforms. With careful decisions you can produce visuals that make a memorable impact.
Also Read This: Showcase Your Work with Canva Portfolio Templates
Tools for Checking and Changing DPI Outside of Canva
As a designer I've frequently found myself wanting greater control over my images than what Canva offers. While Canva is a great tool for crafting beautiful visuals there are instances where you may need to go beyond its limitations. This is where external tools become useful and I've developed a dependence on a select few reliable ones throughout the years.
Here’s a brief overview of some useful tools for verifying and adjusting DPI settings.
- Adobe Photoshop: A powerhouse for image editing, Photoshop allows you to check and change DPI with ease. You can open your image, navigate to Image Size, and adjust the resolution without compromising quality. It’s my go-to tool when I need precision.
- GIMP: This free alternative to Photoshop is a favorite for many. GIMP provides similar functionalities for checking and adjusting DPI, making it a great option for those on a budget.
- Online DPI Checkers: Websites like DPI Analyzer and Get-Metadata let you upload your images and instantly find out their DPI. This quick solution is perfect when you're short on time.
- Paint.NET: Another free tool, Paint.NET, offers a user-friendly interface to change DPI easily. While it may not have all the bells and whistles of Photoshop, it gets the job done effectively.
During my journey I've discovered that dedicating time to the tools can greatly impact the excellence of my designs. Every tool comes with its own set of features, so feel free to experiment and uncover what suits you best!
Also Read This: Instantly Downloading Free Stock Photos from 123RF: Tips
Frequently Asked Questions
Whenever I explore the realm of design I often come across questions that require clarification. If you're delving into the intricacies of DPI you too may be pondering similar thoughts. Let's address some of the inquiries.
- What is DPI? DPI stands for Dots Per Inch and refers to the resolution of an image. A higher DPI means a better-quality image, especially for print.
- How do I know what DPI I need? The DPI you choose depends on the final use of the image. For digital platforms, 72 DPI is typically sufficient, while print requires at least 300 DPI.
- Can I change the DPI without losing quality? Yes, as long as you start with a high-resolution image. Adjusting the DPI may require resizing, so always preview before finalizing.
- Are there online tools for checking DPI? Absolutely! Tools like DPI Analyzer can help you check your image’s DPI without any hassle.
By delving into these inquiries you can deepen your grasp of DPI and equip yourself to craft designs that truly shine.
Conclusion: Making the Most of Your Canva Images
Looking back on my time with Canva I see how grasping DPI and its significance has made a difference. Its not merely about crafting visuals; its about making sure those visuals communicate the right message clearly and effectively. The charm of design is in the nuances and DPI plays a role in that.
By following the strategies we've talked about verifying your DPI and using additional resources when needed you're on track to create eye catching visuals that stand out across various platforms. Keep in mind that each design showcases your imagination and hard work so take your time with it.
Ultimately what truly counts is how your designs connect with your audience. Embrace the process of growth and honing your abilities and your visuals will undoubtedly strike a chord with those who see them. So approach your upcoming project with enthusiasm and zeal—you've got this!