As a creative professional you probably know the excitement of presenting your creations and getting input from viewers worldwide. This is what makes Behance stand out. Its more than just a place to showcase your work; it’s a lively community of artists and designers globally. I recall the moment I stumbled upon Behance it was like entering an expansive art gallery filled with individual showcases by talented artists. It’s a platform where your designs can be seen by others and potentially attract clients collaborators and even job opportunities.
Behance lets you showcase your creations with a touch. The site offers features to help you craft eye catching project showcases that emphasize your talents and ingenuity. Regardless of whether you’re a designer, artist or photographer Behance provides a platform to present your work uniquely. Sharing your projects on this platform goes beyond uploading pictures; it involves connecting with a community that values and offers feedback on your skills.
Here’s why Behance is crucial for designers:
- Visibility: Your work reaches a global audience, potentially leading to new opportunities and collaborations.
- Feedback: Engage with fellow creatives to get constructive criticism and improve your craft.
- Networking: Connect with industry professionals and potential clients.
- Showcase: Present your projects in a professional and visually appealing format.
Getting Started with Adobe Illustrator
Getting started with Adobe Illustrator is an exciting journey. This software plays a role in graphic design and learning to use it well can take your creations to the level. I still remember my initial experiences with Illustrator. It felt overwhelming at first with its array of tools and functions. However once I familiarized myself with it, it quickly became my preferred choice for tasks ranging from crafting logos to creating detailed illustrations.
Here’s a quick rundown to get you started:
- Familiarize Yourself with the Interface: Explore the workspace, toolbars, and panels. Don’t rush; take your time to get comfortable with where everything is.
- Create and Organize Artboards: Artboards are your canvas in Illustrator. Learn how to create multiple artboards for different parts of a project and keep them organized.
- Master Basic Tools: Focus on essential tools like the Pen Tool, Shape Tool, and Type Tool. Practice using them to build a solid foundation.
- Experiment with Layers: Layers help you manage different elements of your design. Use them to keep your project tidy and editable.
Additionally checking out the tutorials and online materials for Illustrator can enhance your grasp of the software. With consistent practice it will start to feel more natural. Believe me transitioning from a beginner to an adept user is a truly fulfilling experience.
Also Read This: How to Sell Assets on Behance
Preparing Your Illustrator Document for Export
Before you go ahead and export your design make sure to double check a few things to ensure it looks its on Behance. I remember a project where I overlooked some important steps and it was quite a lesson to witness my work not being showcased as I had hoped. Here are some tips to steer clear of such situations and get your document ready, like an expert.
To prepare your Illustrator document for export, follow these steps
- Check Your Artboard Sizes: Ensure your artboards are set to the correct dimensions for your intended display. Behance prefers high-resolution images, so aim for at least 72 DPI (dots per inch) for screen viewing.
- Review Your Colors: Use RGB color mode for digital displays. If you’re working with CMYK colors, convert them to RGB before exporting.
- Clean Up Your Layers: Make sure all layers are named appropriately and unnecessary layers are removed. This will make your file easier to manage and reduce the risk of errors.
- Embed Fonts and Images: If you’re using custom fonts or linked images, make sure they’re embedded in your document to avoid missing elements when exporting.
When everything is in place its time to export your file. Select the format like PNG or JPEG to ensure the best quality on Behance. By following these steps you can ensure that your designs appear just as you envisioned and leave a lasting impact on your audience.
Also Read This: How to Find Your Bookmarks on LinkedIn and Access Saved Content
Step-by-Step Guide to Exporting Pages
Exporting your designs from Adobe Illustrator can feel intimidating initially but with a method it can go smoothly. I recall my first attempt at exporting my creations; I was worried about compromising quality or messing up the arrangement. However once I mastered the process I discovered it to be quite rewarding. Lets simplify it into steps for easier understanding.
Here’s a straightforward guide:
- Select Your Artboard: Choose the artboard you want to export. You can do this from the Artboard panel on the right.
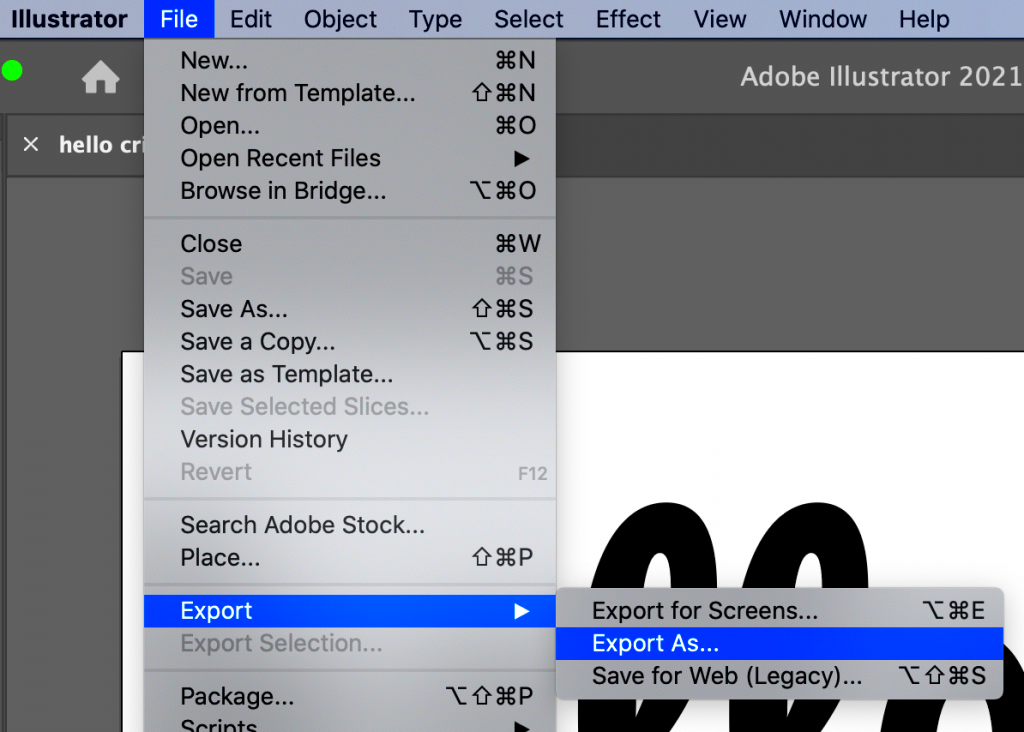
- Go to the File Menu: Click on File in the top menu, then hover over Export and select Export As.
- Choose the Right Format: For Behance, the ideal formats are JPEG or PNG. JPEG is great for photographs, while PNG works well for graphics with transparency.
- Adjust the Settings: In the export dialog, make sure to set the quality to high. This ensures your images maintain their detail.
- Export: Click Export and choose your destination folder. Voila! Your page is ready for the next step.
Keep in mind that honing your skills through repetition is key. As you work on more projects you'll discover your groove and before you know it exporting will come to you effortlessly.
Also Read This: Understanding Depositphotos – A Complete Guide to the Stock Photo Platform
Optimizing Images for Behance
Once you’ve exported your pictures it’s crucial to fine tune them for a stunning appearance on Behance. I discovered this the hard way when my initial uploads were sluggish to load prompting viewers to navigate away. Believe me you want your creations to dazzle smoothly, without any interruptions!
Here’s how to optimize your images:
- Resize Your Images: Aim for a width of 1400 pixels for optimal display without sacrificing quality.
- Compress Images: Use tools like TinyPNG or ImageOptim to reduce file size without losing detail. This helps your images load faster.
- Maintain Aspect Ratio: Ensure your images don’t get stretched. Always keep the same proportions during resizing.
- Color Correction: Make sure your colors look vibrant and true to life. A little adjustment can make a huge difference.
When you make your images better looking you also make the experience better for users visiting your Behance project. Paying attention to these details shows your level of professionalism, as a designer.
Also Read This: How to Resolve YouTube Lagging Problems on Chrome and Other Browsers
How to Upload Your Exported Pages to Behance
Once you’ve polished and enhanced your pictures its time to take the last step by uploading them to Behance. I still remember the rush of excitement I experienced when I clicked on upload for the first time. There’s an undeniable thrill in showcasing your creations to a global audience!
To get your pages on Behance, just follow these steps
- Log In to Behance: If you don’t have an account yet, it’s time to create one. It’s free and simple!
- Create a New Project: Click on the Create a Project button. You can find it on your profile page.
- Upload Your Images: Drag and drop your optimized images into the upload area. You can also click Upload Files to select them from your folder.
- Add Descriptions: Don’t forget to describe your project! Share the story behind your designs and the process you followed. This personal touch makes a difference.
- Publish: Once you’re satisfied with everything, hit the Publish button. Your work is now live for everyone to see!
While showcasing your talent on Behance dont forget to connect with the community. Take the time to reply to comments and show appreciation for the creations of others. Its an essential aspect of fostering relationships, within this delightful artistic environment.
Also Read This: How to Effectively Use Jolen Bleach Creme for Skin Lightening on Your Face
Common Issues and How to Solve Them
Every designer encounters some bumps in the road during their creative process especially when it comes to exporting their designs. I remember a time when I exported my artwork only to see it appear pixelated on Behance. It was disappointing but I gained insights by working through those challenges. In this article I'll highlight problems you may face and provide solutions to overcome them.
1. Blurry Graphics If you save your images at a resolution they may turn out pixelated. To prevent this make sure to select a setting when exporting your visuals. For images intended for print aim for a minimum of 300 DPI.
Uploading a file format can cause problems. Behance mainly supports JPEG and PNG formats. Make sure to convert your images to these formats before uploading them.
Sometimes when you upload designs they might appear misaligned. To prevent this make sure to check your artboard size and layout in Illustrator before exporting.
4. Slow Loading Speeds: Big file sizes can lead to wait times. Consider utilizing image compression tools such as TinyPNG to shrink the file size while maintaining quality. This will improve the overall user experience for your project.
5. Problems with Fonts: If you overlook outlining your text it may not show up properly. To ensure uniformity across different devices always remember to convert your text into outlines.
Keep in mind that there is always a way to overcome challenges. Give yourself some time to work through the issues and before you know it you’ll gain more assurance in your exporting abilities!
Also Read This: How Hard Is It to Sell Photography on Shutterstock and Tips to Succeed
FAQs About Exporting Illustrator Pages for Behance
Throughout my journey in the realm of design and export I’ve come across a multitude of inquiries from fellow creatives. There tends to be a recurring theme in the concerns raised. Below are some commonly asked questions that could assist in clearing up any uncertainties you may have.
- What is the best format for exporting images?
JPEG is preferred for photographs, while PNG works best for graphics needing transparency. - How can I maintain quality when exporting?
Always export at a high resolution, preferably 300 DPI, to ensure crisp, clear images. - What dimensions should my artboard be?
For Behance, 1920x1080 pixels is a common size that works well for most projects. - Can I upload multiple images in one project?
Yes, Behance allows you to upload multiple images, making it easier to showcase a series of related works. - What if my fonts don't display correctly?
To prevent this, always convert your text to outlines before exporting.
If you have any more questions feel free to connect with the Behance community or check out tutorials on the web. The creative community is always ready to offer their support!
Conclusion and Final Thoughts
Looking back on my experience of exporting designs for Behance I can’t help but recall the obstacles and victories that come with being a designer. Every stage, from exporting to refining and ultimately uploading has not only taught me the intricacies of design but also the importance of expressing my unique perspective to the world. It’s a fusion of creativity and narrative.
Whether you’re just starting out or have years of experience as a designer it’s important to embrace the journey. Give yourself permission to stumble along the way, learn valuable lessons and evolve. Each design you share reflects a part of who you are—your ideas, your artistic flair and your dedication. Don’t hold back when it comes to showcasing your creations because the world deserves to witness the magic you bring to life!
Ultimately keep in mind that sites such as Behance serve as a space not only to showcase your work but also to connect with individuals who value creativity. Interact with your audience show support for artists and continue pushing your limits. Enjoy the process of designing!